How to build task assignment email notifications in Medplum with VintaSend


Task assignment is one of those workflows that seems simple until you need it to work reliably in production.
In a Medplum-based app, assigning a task often needs more than just updating a FHIR resource. You may also need to notify the assigned practitioner, personalize the message, keep an audit trail, and support future extensions like reminders or attachments.
In this tutorial, we’ll build a task assignment email notification flow in Medplum using VintaSend, a consistent notification framework, along with VintaSend-Medplum, which provides Medplum-specific adapters for the VintaSend framework.
Note: This tutorial focuses on VintaSend-specific features. The complete working example, including all boilerplate code for Medplum bot deployment, esbuild configuration, and subscription setup, can be found in our GitHub repository.
Why VintaSend?
VintaSend is a flexible TypeScript package designed specifically for transactional notifications. Here’s why it fits this workflow:
Database-backed notification management
- All notifications are stored in your database, providing a complete audit trail
- Track notification status (pending, sent, failed) automatically
- Query past notifications easily for debugging or reporting
Smart scheduling
- Schedule notifications to send at a specific time in the future
- Context is fetched at send-time, ensuring data is always up-to-date
- No stale data - if a user's name changes, scheduled emails use the new name
One-off notifications
- Send emails to prospects or guests without requiring a user account
- Perfect for marketing, invitations, or external communications
- No need to create dummy user records
File attachment support
- Attach files with automatic deduplication (same file stored once)
- Flexible storage backends (S3, Azure, GCS, local filesystem)
- Reuse files across multiple notifications
Modular architecture
- Swap databases, email providers, or template engines independently
- No vendor lock-in - change your email provider without rewriting code
- Easy to test each component in isolation
Healthcare-ready
- Designed with compliance and auditability in mind
- Integrates naturally with FHIR-based systems through VintaSend-Medplum
Why VintaSend-Medplum?
VintaSend-Medplum brings VintaSend's notification capabilities to Medplum healthcare applications with full FHIR compliance:
FHIR-native storage
- Notifications stored as FHIR
Communicationresources - File attachments stored as
BinaryandMediaresources - Seamlessly integrates with your existing Medplum data
Healthcare integration
- Link notifications directly to
PatientorPractitionerresources - Search notifications using standard FHIR queries
- Works with Medplum's existing security and access controls
Flexible email providers
- Use any email provider through VintaSend adapters (SendGrid, AWS SES, Medplum, etc.)
- Swap providers without changing your application code
- This tutorial uses SendGrid for reliable email delivery
Pre-compiled templates
- Pug templates compiled to JSON at build time
- No file system access needed at runtime
- Perfect for serverless/bot environments
Production-ready
- Simple console logging for Medplum bots
- Status mapping to FHIR Communication statuses
- Automatic file deduplication via checksums
Prerequisites
- A Medplum project set up and running
- Basic understanding of TypeScript and FHIR resources
- Node.js and npm installed
- Familiarity with Medplum bots (for deployment, see our complete example)
What we'll build
By the end of this tutorial, you'll have:
- ✅ Email templates for task assignment notifications
- ✅ A notification service configured with VintaSend
- ✅ A service function that sends emails when tasks are assigned
- ✅ Support for personalized emails with user names
- ✅ Priority handling for urgent tasks
- ✅ File attachment support (optional)
- ✅ A scheduled ‘Task due soon’ reminder email (optional)
Step 1: install dependencies
First, add the VintaSend packages to your project:
npm install vintasend vintasend-medplum vintasend-sendgridUpdate your package.json:
{
  "dependencies": {
    "vintasend": "^0.5.1",
    "vintasend-medplum": "^0.5.1",
    "vintasend-sendgrid": "^0.5.1"
  }
}
We're using:
vintasend: The core notification frameworkvintasend-medplum: Medplum-specific adapters for FHIR storagevintasend-sendgrid: SendGrid adapter for email delivery
Step 2: create email templates with Pug
VintaSend supports Pug templates for creating dynamic emails. Let's create templates for our task assignment emails.
Email body template
Create notification-templates/emails/task-assignment/body.html.pug:
doctype html
html
  head
    meta(charset='utf-8')
    style.
      body {
        font-family: Arial, sans-serif;
        line-height: 1.6;
        color: #333;
      }
  body
    h1 Task Assigned

    p Hello #{firstName},

    p You have been assigned a new task by #{requesterName}.

    p
      strong Task:
      |  #{taskTitle}
    if taskDescription
      p
        strong Description:
        |  #{taskDescription}
    if taskIsUrgent
      p
        strong Priority: URGENT

    p
      a(href=taskLink) View Task

    p Please review the task details and take appropriate action.
Email subject template
Create notification-templates/emails/task-assignment/subject.txt.pug:
if taskIsUrgent
  | [URGENT] Task assigned to you: #{taskTitle}
else
  | Task assigned to you: #{taskTitle}
These templates use Pug syntax with dynamic variables like #{firstName}, #{taskTitle}, etc. The templates also handle conditional logic - for example, showing "URGENT" when the task has high priority.
Step 3: compile templates
Medplum bots don't support sending multiple files as source, so they require templates to be pre-compiled into a JSON file and bundled into the compiled bot code.
Add this script to your package.json:
{
  "scripts": {
    "compile-templates": "compile-pug-templates ./notification-templates ./compiled-notification-templates.json"
  }
}
Run the compilation:
npm run compile-templatesThe compile-pug-templates command comes from the vintasend-medplum package and will generate a compiled-notification-templates.json file.
It's recommended that you include this file in your .gitignore file so it isn't added to your git repository.
Step 4: configure the notification service
Next, let’s configure the notification service.
Creating the context generator
Context generators are the bridge between raw notification parameters and enriched template data. They fetch additional information from Medplum to personalize notifications.
Create lib/notification-context-generators/task-assignment.ts:
import type { ContextGenerator } from 'vintasend';
import { MedplumSingleton } from '../medplum-singleton';
import { formatNameWithPreferredName } from '../patients';
import { getUserById } from '../get-user-by-id';
import { getTaskAttachments } from '../file-upload';

export type TaskAssignmentContextInput = {
  taskId: string;
  taskLinkBaseUrl: string;
};

export type TaskAssignmentContextOutput = {
  firstName: string;
  taskTitle: string;
  taskDescription: string;
  taskIsUrgent: boolean;
  taskLink: string;
  requesterName: string;
  attachmentCount: number;
};


export class TaskAssignmentContextGenerator implements ContextGenerator {
  async generate(
    input: TaskAssignmentContextInput
  ): Promise<TaskAssignmentContextOutput> {
    const medplum = MedplumSingleton.getInstance();
    // Fetch the task
    const task = await medplum.readResource('Task', input.taskId);
    if (!task) {
      throw new Error(`Task with id ${input.taskId} not found`);
    }

    // Find owner
    let firstName = 'Practitioner';
    let requesterName = '';
    if (task.owner?.reference) {
      const user = await getUserById(medplum, task.owner.reference);
      firstName = formatNameWithPreferredName(user.name?.[0]) ?? 'Practitioner';
    }

    // Find requester name
    if (task.requester?.reference) {
      const requester = await getUserById(medplum, task.requester.reference);
      requesterName = formatNameWithPreferredName(requester.name?.[0]) ?? '';
    }

    // Count attachments
    const attachmentCount = (await getTaskAttachments(medplum, task)).length;

    // Build task link (assuming a base URL is available via env or config)
    const taskLinkBaseUrl = input.taskLinkBaseUrl || '';
    const taskLink = taskLinkBaseUrl && task.id ?
      `${taskLinkBaseUrl}/Task/${task.id}`
      : '';

    return {
      firstName,
      taskTitle: task.code?.text || '',
      taskDescription: task.description || '',
      taskIsUrgent: !!task.priority && task.priority.toLowerCase() === 'stat',
      taskLink,
      requesterName,
      attachmentCount,
    };
  }
}
Why context generators?
Context generators:
- Separate concerns: Keep data fetching logic out of the main service
- Enable reuse: Use the same context generator for multiple notification types
- Support lazy loading: Fetch data only when sending the notification, not when creating it
- Allow testing: Test each context generator independently
Configuring the notification service
Create lib/notification-service.ts:
import { MedplumClient } from '@medplum/core';
import type { BotEvent } from '@medplum/core';
import { VintaSendFactory } from 'vintasend';
import * as compiledTemplates from '../compiled-notification-templates.json';
import {
  MedplumNotificationBackend,
  MedplumAttachmentManager,
  PugInlineEmailTemplateRendererFactory,
  MedplumLogger
} from 'vintasend-medplum';
import { SendgridNotificationAdapterFactory } from 'vintasend-sendgrid';
import {
  TaskAssignmentContextGenerator
} from './notification-context-generators/task-assignment';

// context map for generating the context of each notification
export const contextGeneratorsMap = {
  taskAssignment: new TaskAssignmentContextGenerator(),
} as const;

export type NotificationTypeConfig = {
  ContextMap: typeof contextGeneratorsMap;
  NotificationIdType: string;
  UserIdType: string;
};

export type SendGridConfig = {
  SENDGRID_API_KEY: string;
  SENDGRID_FROM_EMAIL: string;
  SENDGRID_FROM_NAME: string;
};

export function buildSendGridConfig(event: BotEvent): SendGridConfig {
  const apiKey = event.secrets.SENDGRID_API_KEY?.valueString;
  const fromEmail = event.secrets.SENDGRID_FROM_EMAIL?.valueString;
  const fromName = (
    event.secrets.SENDGRID_FROM_NAME?.valueString
    || 'Medplum Notifications'
  );

  if (!apiKey) {
    throw new Error('SENDGRID_API_KEY must be configured in bot secrets');
  }

  if (!fromEmail) {
    throw new Error('SENDGRID_FROM_EMAIL must be configured in bot secrets');
  }

  return {
    SENDGRID_API_KEY: apiKey,
    SENDGRID_FROM_EMAIL: fromEmail,
    SENDGRID_FROM_NAME: fromName,
  };
}

export function getNotificationService(
  medplum: MedplumClient,
  sendgridConfig: SendGridConfig
) {
  const backend = new MedplumNotificationBackend<NotificationTypeConfig>(medplum);
  const templateRenderer = (
    new PugInlineEmailTemplateRendererFactory<NotificationTypeConfig>().create(
      compiledTemplates
    )
  );
  const adapter = (
    new SendgridNotificationAdapterFactory<NotificationTypeConfig>().create(
      templateRenderer, false, {
        apiKey: sendgridConfig.SENDGRID_API_KEY || '',
        fromEmail: sendgridConfig.SENDGRID_FROM_EMAIL || '',
        fromName: sendgridConfig.SENDGRID_FROM_NAME,
      }
    )
  );
  return new VintaSendFactory<NotificationTypeConfig>().create(
    [adapter],
    backend,
    new MedplumLogger(),
    contextGeneratorsMap
  );
}
Understanding the notification service
This file is the core of VintaSend integration:
- Context Generator: The
TaskAssignmentContextGeneratortakes raw notification parameters and enriches them with data from Medplum (like the user's first name). It implements theContextGeneratorinterface and is called automatically by VintaSend before rendering templates.
- Type Safety: TypeScript types ensure that context parameters match what the templates expect.
- VintaSend Components:
- Backend: Stores notification data in Medplum as FHIR
Communicationresources - Template Renderer: Renders Pug templates from the compiled JSON
- Adapter: Handles email sending through SendGrid
- Logger: Logs notification events for debugging
- Backend: Stores notification data in Medplum as FHIR
- SendGrid Configuration: The adapter is configured with SendGrid credentials passed via the
SendGridConfigobject, which is built from Medplum bot secrets using thebuildSendGridConfig()helper:SENDGRID_API_KEY: Your SendGrid API keySENDGRID_FROM_EMAIL: The verified sender email addressSENDGRID_FROM_NAME: Optional display name for the sender
Step 5: create the task assignment email service
Now let's create the service function that sends emails when tasks are assigned.
Create services/emails/send-task-assignment-email.ts:
import { MedplumClient } from '@medplum/core';
import { Task } from '@medplum/fhirtypes';
import {
  getNotificationService, SendGridConfig
} from '../../../lib/notification-service';
import { getTaskAttachments } from '../../../lib/file-upload';

export async function sendTaskAssignmentEmail(
  medplum: MedplumClient,
  task: Task,
  taskLinkBaseUrl: string,
  sendgridConfig: SendGridConfig
) {
  /* sends a task assignment email to a practitioner */

  if (!task.owner?.reference) {
    throw new Error('Task must have an owner reference');
  }

  // Skip sending email if task is assigned to a Group
  const [resourceType] = referenceString.split('/');
  if (resourceType === 'Group') {
    return;
  }

  const vintasend = getNotificationService(medplum, sendgridConfig);

  if (!task.id) {
    throw new Error('Task must have an id to send task assignment email');
  }

  await vintasend.createNotification({
    userId: referenceString,
    notificationType: 'EMAIL' as const,
    title: 'Task Assignment',
    contextName: 'taskAssignment' as const,
    contextParameters: {
      taskId: task.id,
      taskLinkBaseUrl,
    },
    sendAfter: new Date(),
    bodyTemplate: 'emails/task-assignment/body.html.pug',
    subjectTemplate: 'emails/task-assignment/subject.txt.pug',
    extraParams: {},
  });
}
Key features
- Validation: Checks that the task has an owner before attempting to send
- Group Handling: Skips sending emails when tasks are assigned to Groups (not individual users)
- Priority Support: Detects urgent tasks and passes that information to the template
- Error Handling: Gracefully handles missing data and logs errors
- Requester Info: Fetches the name of the person who created the task for context
Step 6: using the service
You can now use the service in your Medplum bots or application code:
import { BotEvent, MedplumClient } from '@medplum/core';
import { Task } from '@medplum/fhirtypes';
import { sendTaskAssignmentEmail } from '../services/emails/send-task-assignment-email';
import { buildSendGridConfig } from '../../lib/notification-service';
import { MedplumSingleton } from '../../lib/medplum-singleton';


/**
 * Medplum Bot: Task Assignment Email Notification
 *
 * This bot is triggered by a subscription when a Task is created or updated
 * with an owner. It sends an email notification to the assigned practitioner.
 *
 * Subscription Criteria: Task?owner:exists=true
 * Triggers: create, update
 */

export async function handler(medplum: MedplumClient, event: BotEvent): Promise<Task> {
  const task = event.input as Task;
  const sendGridVariables = buildSendGridConfig(event);

  // We need to use a singleton here, so the context generators
  // have access to the medplum client
  MedplumSingleton.setInstance(medplum)

  if (!task.id) {
    console.error(
     '[TaskAssignmentBot] Task does not have an id, skipping email notification'
    );
    return task;
  }

  // Only send email if task has an owner
  if (task.owner?.reference) {
    const appBaseUrl = event.secrets.PROVIDER_APP_BASE_URL?.valueString;
    if (!appBaseUrl) {
      throw new Error('PROVIDER_APP_BASE_URL must be configured in bot secrets');
    }
    try {
      await sendTaskAssignmentEmail(medplum, task, appBaseUrl, sendGridVariables);
    } catch (error) {
      console.error(
        `[TaskAssignmentBot] Failed to send email for task: ${task.id}`, error
      );
      // Don't throw - we don't want the subscription to fail
      // The notification will be logged in Medplum as failed
    }
  }

  // Return the task unchanged
  return task;
}
Testing the integration
Create or update a Task with an owner to trigger the email:
const task = await medplum.createResource({
  resourceType: 'Task',
  status: 'requested',
  intent: 'order',
  priority: 'routine', // or 'urgent' for urgent tasks
  code: {
    text: 'Review patient chart',
  },
  description: 'Please review the patient chart and update the care plan',
  owner: {
    reference: 'Practitioner/123', // The practitioner who will receive the email
  },
  requester: {
    reference: 'Practitioner/456', // Who requested the task
  },
});

// Send the email (from a bot handler)
// In your bot, you would get these from event.secrets
const sendgridConfig = buildSendGridConfig(event);
await sendTaskAssignmentEmail(medplum, task, 'https://your-app-url.com', sendgridConfig);
If you want to automate this, you can create a subscription pointing to your bot with Task?owner:exists=true as criteria:
{
  "resourceType": "Subscription",
  "status": "active",
  "reason": "send-task-assignment-email-subscription",
  "criteria": "Task?owner:missing=false",
  "extension": [],
  "channel": {
    "endpoint": "Bot/3da5e4db-779a-4181-ae9c-c216acb61d07",
    "type": "rest-hook",
    "payload": "application/fhir+json"
  },
  "id": "3c039320-f138-48b5-abcf-4e3438346ddc",
  "meta": {
    "versionId": "5d42ac54-9264-43be-a1a1-947373200f88",
    "lastUpdated": "2026-01-25T19:37:33.598Z",
    "author": {
      "reference": "ClientApplication/04607d33-52aa-4491-a37f-9e524baacf9c",
      "display": "vintasend-medplum-example Default Client"
    },
    "project": "b9b8f9d3-01fe-4a34-b34e-34dbeabc3ea8",
    "compartment": [
      {
        "reference": "Project/b9b8f9d3-01fe-4a34-b34e-34dbeabc3ea8"
      }
    ]
  }
}
How it works: the full flow
Let's trace through what happens when you call sendTaskAssignmentEmail():
- Validation: The service validates the task has an owner and isn't assigned to a Group
- Data Enrichment:
- Fetches the requester's name
- Builds the task link
- Determines if the task is urgent
- Notification Created: VintaSend's
createNotification()is called with:- User ID (the FHIR reference)
- Context parameters (taskTitle, taskDescription, etc.)
- Template paths
- Context Generation: The
TaskAssignmentContextGeneratorruns:- Fetches the recipient's user record from Medplum
- Extracts their first name (respecting preferred names)
- Merges with the provided parameters
- Template Rendering: Pug templates are rendered with the enriched context
- Email Sent: The email is sent via SendGrid's API
- Notification Stored: VintaSend stores the notification record in Medplum as a FHIR Communication resource for auditing
Deployment & infrastructure
To deploy this in a production Medplum environment, you'll need:
- Medplum Bot Handler: A bot function that calls
sendTaskAssignmentEmail()when tasks are created/updated - FHIR Subscription: A subscription that triggers the bot when
Task?owner:missing=false - Build Configuration: esbuild or similar bundler to compile the bot code
- Bot Secrets: Configure these secrets in your Medplum bot:
SENDGRID_API_KEY: Your SendGrid API keySENDGRID_FROM_EMAIL: The verified sender email addressSENDGRID_FROM_NAME: Optional display name for the senderPROVIDER_APP_BASE_URL: The base URL of your application
Complete implementation details (including bot handlers, subscriptions, deployment scripts, and esbuild configuration) are available in our GitHub repository.
Benefits of this approach
✅ Type-Safe: TypeScript ensures your context parameters match your templates
✅ Testable: Each component can be tested in isolation
✅ Maintainable: Templates are separate from logic
✅ Extensible: Easy to add new notification types
✅ FHIR-Native: Integrates seamlessly with Medplum's FHIR data model
✅ Auditable: All notifications are stored as FHIR resources
Advanced: file attachments for task notifications
One of VintaSend's strongest features is built-in attachment management. Files are stored efficiently in Medplum as FHIR Binary resources with automatic deduplication.
Why use VintaSend for attachments?
Automatic deduplication
- Files with identical content stored once via checksum
- Multiple notifications can reference the same file
- Reduces storage costs
FHIR-native storage
- Files stored as Binary resources
- Metadata stored as Media resources
- Full FHIR compliance and access control
Email provider agnostic
- Works with SendGrid, AWS SES, or any adapter
- Attachment handling abstracted from email provider
- Easy to switch providers without code changes
Understanding FHIR file storage
FHIR provides two resource types for handling files:
- Binary resource: Stores the actual file content
- Contains raw file data (base64 encoded or direct binary)
- Has minimal metadata (content type, data)
- Used as the storage layer
- Media resource: Provides file metadata and references
- Links to a Binary resource via content.url
- Contains rich metadata (title, creation date, subject, etc.)
- Used as the presentation/reference layer
Why use both?
Using Binary + Media follows FHIR best practices:
- Separation of concerns: Data storage (Binary) vs metadata (Media)
- Reusability: Multiple Media resources can reference the same Binary
- Deduplication: VintaSend automatically detects duplicate files via checksum
- Access control: Fine-grained permissions on Media without exposing Binary directly
File upload utilities
Create a lib/file-upload.ts:
import { MedplumClient } from '@medplum/core';
import { Binary, Media, Reference, Task, TaskInput } from '@medplum/fhirtypes';

export interface FileUploadResult {
  binary: Binary;
  media: Media;
}

/**
 * Uploads a file to Medplum and creates both Binary and Media resources.
 */
export async function uploadFileToMedplum(
  medplum: MedplumClient,
  fileData: ArrayBuffer | string,
  fileName: string,
  contentType: string
): Promise<FileUploadResult> {
  // Create Binary resource to store the file content
  const binary = await medplum.createResource<Binary>({
    resourceType: 'Binary',
    contentType: contentType,
    data: typeof fileData === (
      'string' ?
        fileData
        : btoa(String.fromCharCode(...new Uint8Array(fileData)))
    ),
  });

  // Create Media resource to store metadata
  const media = await medplum.createResource<Media>({
    resourceType: 'Media',
    status: 'completed',
    content: {
      url: `Binary/${binary.id}`,
      contentType: contentType,
      title: fileName,
    },
  });

  return { binary, media };
}

/**
 * Retrieves all Media resources attached to a Task.
 */
export async function getTaskAttachments(
  medplum: MedplumClient,
  task: Task
): Promise<Media[]> {
  if (!task.input || task.input.length === 0) {
    return [];
  }

  const attachmentInputs = task.input.filter(
    (input) => input.type?.coding?.[0]?.code === 'attachment'
  );

  const mediaPromises = attachmentInputs
    .map((input) => {
      const mediaRef = input.valueReference?.reference;
      if (!mediaRef) return null;

      return medplum.readReference<Media>({ reference: mediaRef })
        .catch((error) => {
          console.error(`Failed to fetch Media resource: ${mediaRef}`, error);
          return null;
        });
    })
    .filter((promise): promise is Promise<Media | null> => promise !== null);

  const mediaResources = await Promise.all(mediaPromises);
  return mediaResources.filter((media): media is Media => media !== null);
}
This file will help you make sure you upload files in the format the VintaSend Attachment Manager implementation for Medplum expects.
In our example app we have modified the default Medplum Provider app New Task Dialog to include file uploads in the right format, you can check it out here.
Adding attachments to notifications
Update your sendTaskAssignmentEmail function to include attachments:
// Retrieve task attachments
const taskAttachments = await getTaskAttachments(medplum, task);

// Convert Media resources to VintaSend attachment references
// Use fileId to reference existing Media resources instead of re-uploading
const attachments = taskAttachments
  .filter((media) => media.id) // Only include media with IDs
  .map((media) => ({
    fileId: media.id as string,
    description: media.content?.title,
  }));


await vintasend.createNotification({
  userId: referenceString,
  notificationType: 'EMAIL' as const,
  title: 'Task Assignment',
  contextName: 'taskAssignment' as const,
  contextParameters: {
    taskId: task.id,
    taskLinkBaseUrl,
  },
  sendAfter: new Date(),
  bodyTemplate: 'emails/task-assignment/body.html.pug',
  subjectTemplate: 'emails/task-assignment/subject.txt.pug',
  attachments,
  extraParams: {},
});
How attachments work
- File Upload: Files are uploaded to Medplum as Binary resources
- Metadata Creation: Media resources reference the Binary and store filename/type
- Task Association: Media references are added to the Task's
inputarray - Notification Creation: When creating a notification, pass
attachmentIds(Binary IDs) - VintaSend Processing: VintaSend's
MedplumAttachmentManagerfetches the files - Email Sending: Files are attached to the email via the SendGrid adapter
- Deduplication: VintaSend checks checksums to avoid storing duplicate files
Complete file upload UI examples (React components for file selection, validation, and preview) are available in our GitHub repository.
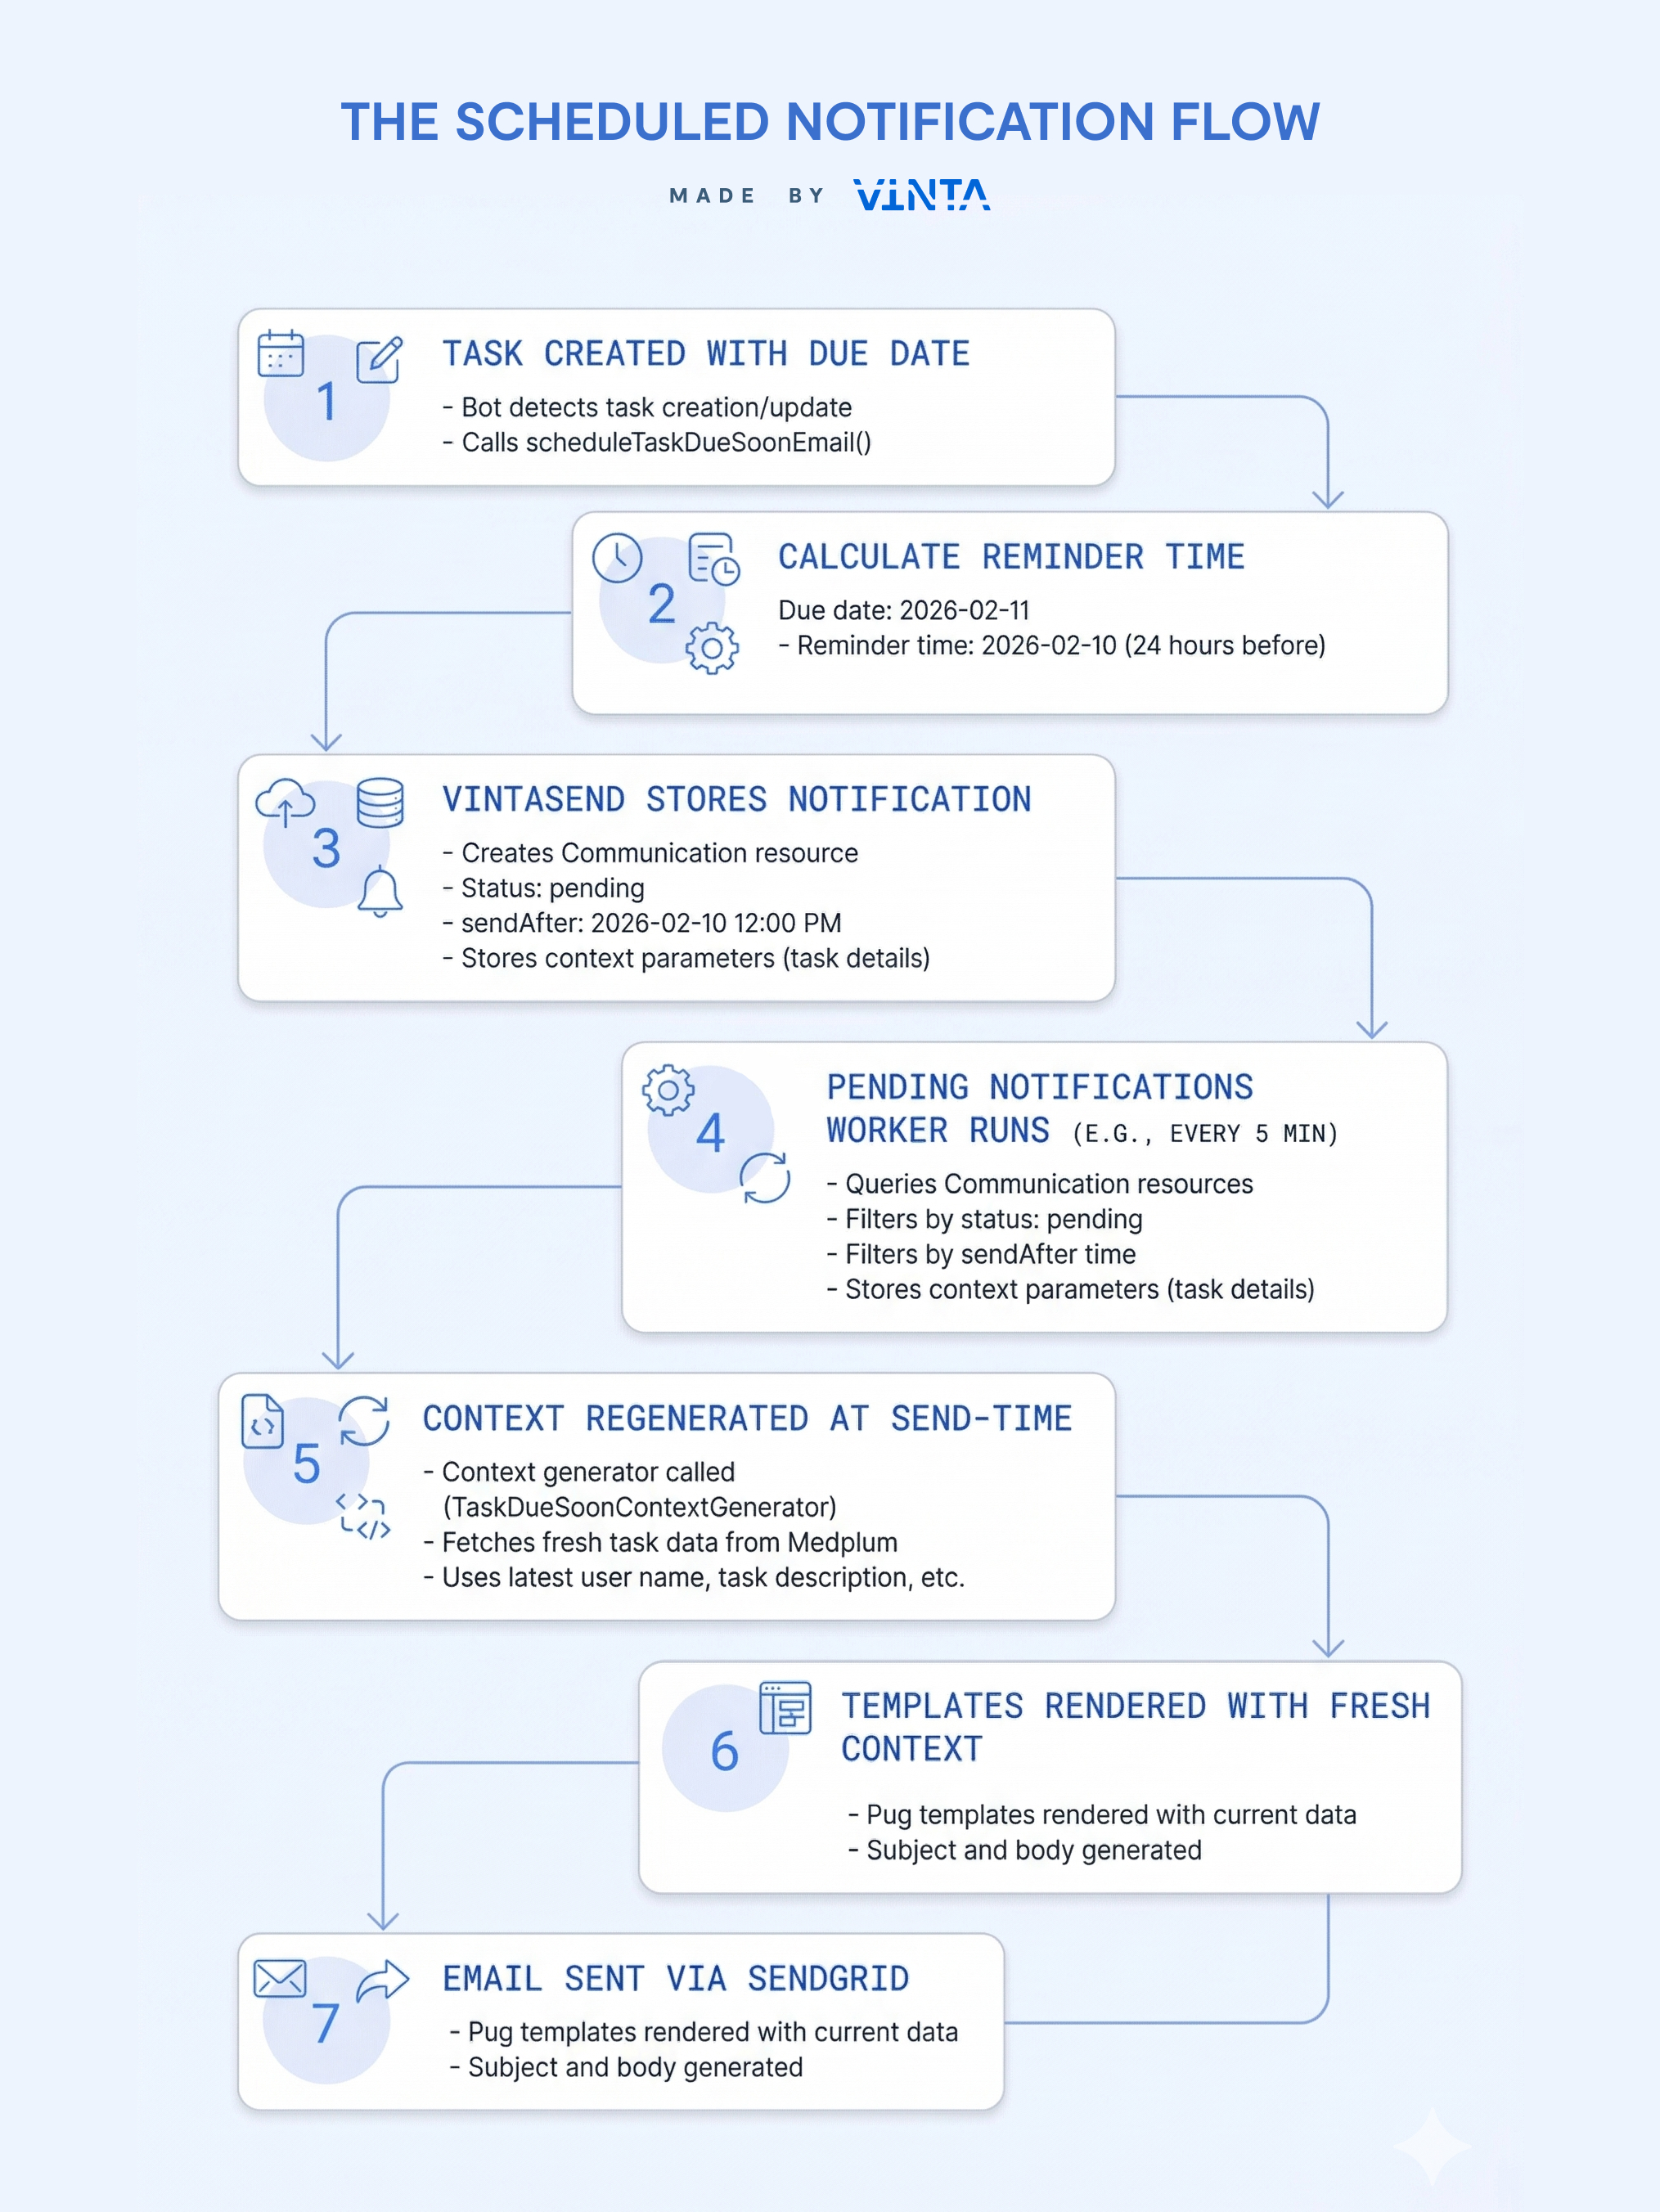
Advanced: scheduled notifications with task due soon reminders
One of VintaSend's most powerful features is the ability to schedule notifications for future delivery. Instead of sending an email immediately, you can specify a sendAfter date and VintaSend will automatically send the notification at the right time.
Why use scheduled notifications?
Fresh data at send time
- Context is fetched when the notification is sent, not when it's scheduled
- If a user's name or task details change, the email will use the latest information
- No stale data issues
Scheduled delivery
- Send reminders at scheduled times (24 hours before, 1 week before, etc.)
- Notifications are sent within 5 minutes of the scheduled time (based on your cron frequency)
- No need to manually track when to send each notification
Audit trail
- All notifications stored as FHIR
Communicationresources - Track status changes (pending → sent/failed). In FHIR Communications, the status would be “preparation” for pending, “completed” for sent, and “entered-in-error” for failed.
- Full history of scheduled and sent notifications
Creating task reminder templates
Create email templates for task due reminders:
Email body template
Create notification-templates/emails/task-due-soon/body.html.pug:
doctype html
html
  head
    meta(charset='utf-8')
    style.
      body {
        font-family: Arial, sans-serif;
        line-height: 1.6;
        color: #333;
      }
  body
    h1 Task Due Reminder

    p Hello #{firstName},

    p This is a reminder that a task assigned to you is due soon.

    p
      strong Task:
      |  #{taskTitle}
    if taskDescription
      p
        strong Description:
        |  #{taskDescription}

    p
      strong Due Date:
      |  #{dueDate}

    if taskIsUrgent
      p
        strong Priority: URGENT

    p
      a(href=taskLink) View Task

    p Please make sure to complete this task before the due date.
Email subject template
Create notification-templates/emails/task-due-soon/subject.txt.pug:
if taskIsUrgent
  | [URGENT] Task due soon: #{taskTitle}
else
  | Reminder: Task due soon - #{taskTitle}
Scheduling notifications
To schedule a notification for a specific time, use the sendAfter parameter in VintaSend:
const dueDate = new Date(task.restriction?.period?.end);
const reminderTime = (  // 24 hours before
  new Date(dueDate.getTime() - 24 * 60 * 60 * 1000)
);
await vintasend.createNotification({
  userId: referenceString,
  notificationType: 'EMAIL' as const,
  title: 'Task Due Soon',
  contextName: 'taskDueSoon' as const,
  contextParameters: {
    taskId,
  },
  sendAfter: reminderTime, // KEY: Specify when to send
  bodyTemplate: 'emails/task-due-soon/body.html.pug',
  subjectTemplate: 'emails/task-due-soon/subject.txt.pug',
  extraParams: {},
});
Key Point: VintaSend will automatically send this notification at the reminderTime. The context is fetched at send-time, ensuring the email contains the most current information.
You can check a full implementation of the task-due-soon notification by looking at the bot handler and the scheduleTaskDueSoonEmail.
You can also check how we've set up our Subscription so we run automatically when a task is created or updated:
Processing scheduled notifications
Scheduled notifications are stored in your database (as FHIR Communication resources) and need to be processed by a background job. This job checks for notifications with a sendAfter time in the past and sends them.
This job can be run as a bot attached with a cron schedule. The frequency depends on how precisely on time you want notifications to be sent. On our example app we configured the job to run every 5 minutes.
The pending notifications worker
The pending notifications worker is essential - it's responsible for finding all pending notifications that are ready to send and processing them. Here's the basic structure:
import { MedplumClient } from '@medplum/core';
import { Communication } from '@medplum/fhirtypes';
import { getNotificationService } from '../lib/notification-service';

export async function processPendingNotifications(medplum: MedplumClient, sendgridConfig: SendGridConfig) {
  // Query for all pending notifications where sendAfter is in the past
  const pendingNotifications = await medplum.searchResources('Communication', {
    status: 'preparation', // Pending status
    '_sort': '_lastUpdated', // Process oldest first
  });

  const vintasend = getNotificationService(medplum, sendgridConfig);

  for (const notification of pendingNotifications) {
    try {
      // VintaSend handles sending and updating status automatically
      await vintasend.sendPendingNotification(notification);
      // Mark as failed but continue processing others
    }
  }
}
How it works:
- Query Pending: Searches for all Communication resources with status preparation (pending)
- Iterate: Processes each notification
- Regenerate Context: When sendPendingNotification() is called, VintaSend:
- Retrieves the stored context parameters
- Calls the appropriate context generator to fetch fresh data
- Ensures the email has the most current information
- Send Email: Renders templates with fresh context and sends via SendGrid
- Update Status: Changes status to sent (or failed on error)
Why the worker is necessary
The pending notifications worker is essential because:
- Decouples Scheduling from Sending: When a task is created with a due date, we just store the notification. The worker sends it later.
- Handles Timing: The worker runs on a schedule (e.g., every 5 minutes via cron). When sendAfter time arrives, the notification is ready to send.
- Fetches Fresh Data: Context generators run at send-time, not schedule-time, ensuring data is always current.
- Handles Failures: If a notification fails to send, it stays pending and will be retried on the next worker run.
- Scales Better: Instead of sending everything immediately, one worker processes all scheduled notifications for all users.
Deployment
The worker typically runs as:
- Scheduled Job: A cron job that runs every 5-10 minutes
- Medplum Bot: A Medplum bot triggered by a timer subscription
- Separate Service: A standalone Node.js service polling the database
The complete implementation details (including cron configuration, worker deployment, and error handling) are available in our GitHub repository.
How it works: the scheduled notification flow
Benefits of scheduled notifications
✅ Always fresh data
- Even if scheduled days in advance, the email contains current information
- Changes to task details reflected in the reminder email
- No need to re-process or update scheduled notifications
✅ Distributed processing
- Scheduled notifications offload work from task creation
- One background job processes all reminders for all users
- Scales better than sending everything immediately
✅ Flexible timing
- Schedule at any time in the future
- Easy to implement multiple reminders (1 week before, 1 day before, etc.)
- Change scheduling logic without affecting sent notifications
✅ Reliable delivery
- Notifications retried if send fails
- Failed notifications logged in Communication resources
- No lost reminders
Next steps
You now have a fully functional email notification system with VintaSend! Here are some ideas for extending it:
- Add more notification types: Create new context generators and templates for different events
- Scheduled notifications: Use VintaSend's scheduling features to send reminders
- One-off notifications: Send emails to external users without FHIR resources
- Multi-channel: Add SMS or push notifications alongside email
- Attachment validation: Add file type and size restrictions
For complete working examples and production-ready code, check out our GitHub repository.